Pages

LIFE IS A JOURNEY, ARE YOU READY?

Showing posts with label paper. Show all posts

MAPPING NOMAC : THE DIY LOGO


I was fiddling the other day in between my travels, just sketching and doing my handicrafts. I thought of my friend Swee who started her handicraft business, Swiedebie from scratch in The Netherlands. It was a tough start with no income for a couple of years. It was a lot of creation and recycling materials, upcycling in a way, and then braving the weather at art and craft fairs in the country to try to establish her brand of plushies and handmade wonder. I cringed at the thought of spending on materials when you are struggling with income and the whole notion of profiting to feed yourself is a faraway idea.

I started to think of how one could easily produce their own logo by hand and yet having it look more or less professionally duplicated. Sure there are rubber stamps, potato cuts and stencils. But these methods do not allow one to scale it easily. What if the only tools I have are the trusty old scissors and pencil? Here is the challenge: how can I simplify the process?

I thought of Macca Lee who embarked on his 7-month trip around Europe. How he could use his web name 'Mapping Nomac' all around the world like those who became worldwide memes by dancing or posing all around the globe.


I started toying with the idea of paper crafting and played with different folds and cuts. The accordion fold seemed like a simplified fold in this case, making it almost creating each letter in a 'factory line'. Not all names could be applied to this method. Nomac is short enough and all the letters have almost symmetrical forms. You will see what I mean in the next few pictures. Swiedebie would not be a good name to try on this simple duplication.

All you need is paper, a pen or pencil, a pair of scissors and something round for a more precise curve to be drawn.


This is the final logo of Mapping Nomac. It is black just as a default. It could well take on anything one can get hold of. Be it maps, used leaflets, magazine spread, menus, tickets...etc.


Just finish off with 'Mapping' in handwriting for that personal touch.

10 AMAZING PAPER TRICKS

DIY CHILDREN'S CARDBOARD FURNITURE

If only every kid could be so hip.  This cardboard, easy DIY furniture set is available in three fabulous colors, comes with two stools and a desk, and stores in a snap! Perfect for your mod dwellings. 


EASY NOTEBOOK, EASY FOLDER

Saw this on Pinterest. So cool and so easy. A few rubber bands around the front of a notebook and you have everything you need all in one spot.

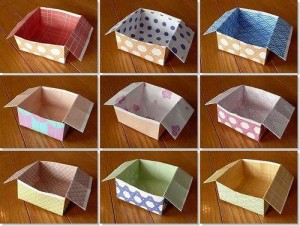
USEFUL ORIGAMI : BOXES FOR SNACKS AND A SPICE HOLDER


RECYCLED MAGAZINE CRAFT SPOTTED IN HONG KONG

THE SMART CONVENIENT STOOL THAT IS FREE

We love ideas like this. We love being resourceful, we love recycling, we love instant, quick ideas. This totally works for us.

DESIGNS THAT MAKE SENSE

Why bother with designs that do not make sense when you can have wonderful design ideas that convey something? All you need is to just think a little harder and let that imagination go wild.

WHO SAYS SNOWFLAKES ARE ONLY FOR XMAS? THESE STAR WARS FLAKES WOULD GO BRILLIANTLY FOR THE WHOLE YEAR.

Speaking of Darth Vader, if regular snowflakes are two boring for your Christmas party these Star Wars snow flakes might be just the right bit of décor. It’ll take more effort than a regular ol’ paper snow flake but the end result is far cooler than anything you ever hacked to life during grade school craft sessions.

INSTRUCTIONS HERE

IF NO ONE IS GIVING YOU ROSES, MAKE YOURSELF SOME

THE PROBABLE BEST AD IN THE WORLD TEACHES YOU HOW TO TURN A MAGAZINE PAGE INTO A BOTTLE OPENER

Is this for real? We got to try this one day. It probably depends on the grammage of the paper. Notice they are only using the cover of the magazine.

LAST MINUTE CHRISTMAS CRAFTS FOR KIDS


Hands as stencils for tree layers? You get the drift.

MAKE YOUR OWN DECORATIONS THIS CHRISTMAS SEASON

Why buy decorations when you can make new ones every year?

Leftover yarns or have some old clothes lying around?

Starry starry night starts tonight with some old magazines and telly.

MAKE YOUR OWN GERMAN PSYCHIC OCTOPUS PAUL USING ORIGAMI

Surely you have some time to spare before the World Cup Finals on Sunday. Try these instructions to make your own psychic octopus. They don't look too easy but you just might become psychic yourself if you manage to make one.


This is easy enough.

START WEAVING MAGAZINE COASTERS

We created this woven magazine coaster when we were bored and fidgeting with our fingers in front of the TV a while back. We were appalled by the amount of magazines our sisters buy and throw away every month. There has to be something useful we can make from them. We were inspired by those little woven paper hearts we used to make as kids for our candies. The sturdiness of folded magazine paper impressed us.

Though it is something you would throw away, we saw how wonderful they can be as 'raw' materials.
  • They are water absorbent and dry fairly quickly.
  • They are colorful. We remember recycling them for our art projects to make collages.
  • They are free, considering you are going to throw them into the recycling bit.
  • They are really sturdy when folded into a substantial thickness.
We have posted some instructions before. But those were from early days when we were overworked in the office and only had a camera phone. This is a fun project and it will get easier after a few practice. The result are wonderfully urban chic woven coasters to set any dinner party talking. It makes a great gift and addition to any home. Many people have asked for a complete and clearer set of instructions and we are presenting them to you here;

1. You will need a magazine. Fashion magazines are the best as they come in a rainbow of colors. The grammage also makes it easy to fold.

2. Flip through the magazine and see which color pages catch your fancy. You can pick pages with words or just pictures.

3. Find the page you like and bend the spine as much as possible to somewhat break the glue. It is also important to make sure that your magazine is glue bound. Use a pen knife to score the glue, your page will come out beautifully.

4. Score and remove 4 pages. Those 4 pages will determine the color scheme of your coaster.

5. Fold the A4 or US Letter size page in half.

6. We like to use the back of the pen knife to flatten all the folds. This helps to make sure your weaving strips are equally flat and also makes slicing easier.

7. Slice the page in half.

8. Fold the half in half again.

9. Slice.

10. You will be left with 4 quarters from the magazine page. Flip to the side of the paper with your preferred color.

11. Fold a quarter into half.

12. Fold one edge inwards.

13. Fold the other edge in. This is to hide all the edges so you will be left with reinforced edges that do to tear easily.

14. Fold the strip into half. This will be your weaving strip, creating a "V". You will need to make 16 of them.

15. To begin weaving, you will need to 'lock' the 2 'V's together. This is essential in keeping all the weaves in place. These are your base strips.

16. Take a 3rd strip. The base strip should go into the 'V' of this 3rd strip.


17. Take another strip and weave it on top of the base. The rule to remember – A strip should always be wrapped over another strip. It should always go into the 'V' of another strip.

 18. Continue adding strips to the base. Remember, into the 'V' of one strip, over the 'V' of another strip.

19. You would have successfully woven the first 2 rows. Now you will learn to finish the end so that the strips will not move out of place as you continue to weave.

20. Trim off one side of the strips.

21. Fold the remaining strips over to gauge the length. The base strip is long enough to be tucked into 2 squares.

22. Tuck the base strip into the 1st square.

23. Tuck the end of the base strip into the 2nd square.

24. Gauge the other strip. It is longer than the square it can be tucked into.

25. Trim the excess length off the strip.

26. Tuck in the trimmed strip. It will hide the edge.

27. You would have successfully secured the 1st 2 rows now. It should look like this.

28. Weave through the next strip. It helps to give you a tighter weave by folding down the alternative strips.

29. Complete the weave on the other side. Trim and secure the end of the strip.

 30. Continue weaving and securing the ends until you have achieved 8 by 8 squares.

31. Trim off one side of all the strips and continue to trim, tuck and secure the ends as described in steps 24-26.

32. Congratulations on weaving your 1st magazine coaster. You can also make a smaller coaster by 14 strips and achieving a a 7 by 7 square.

To learn how to make a smaller, thicker strip, check out our old post on a 3-fold strip.
Related Posts Plugin for WordPress, Blogger...